Drilling into a concrete lintel is a common DIY task. Whether you’re hanging curtain rails or fixing a curtain track, understanding the process is essential.
Concrete lintels provide support above window and door openings in masonry structures. With the right tools and techniques, drilling into a concrete lintel can be manageable and safe.

Key Takeaways:
- Drilling into a concrete lintel is a common DIY task.
- Concrete lintels provide support above window and door openings in masonry structures.
- Choosing the appropriate drill bits based on the type of lintel is crucial for successful drilling.
- Safety precautions, such as wearing goggles and measuring accurately, should always be followed.
- Taking breaks and maintaining a right angle while drilling contributes to a professional finish.
Understanding Lintels: Steel vs. Concrete
When it comes to drilling into lintels, it’s important to understand the differences between concrete and steel lintels. Concrete lintels are commonly used in masonry structures to provide support above window and door openings. These lintels are made of concrete and can be drilled into using masonry drill bits. On the other hand, steel lintels are often found in modern buildings and are used to support heavier loads. When drilling into a steel lintel, specific drill bits, such as high-speed steel (HSS) bits, are required for optimal results.
Table: Comparing Concrete and Steel Lintels
| Concrete Lintels | Steel Lintels |
|---|---|
| Commonly used in masonry structures | Found in modern buildings |
| Require masonry drill bits | Require specific drill bits, such as HSS bits |
| Provide support above window and door openings | Used to support heavier loads |
Now that we understand the differences between the two types of lintels, we can proceed to discuss the tools and techniques needed for drilling into each type.
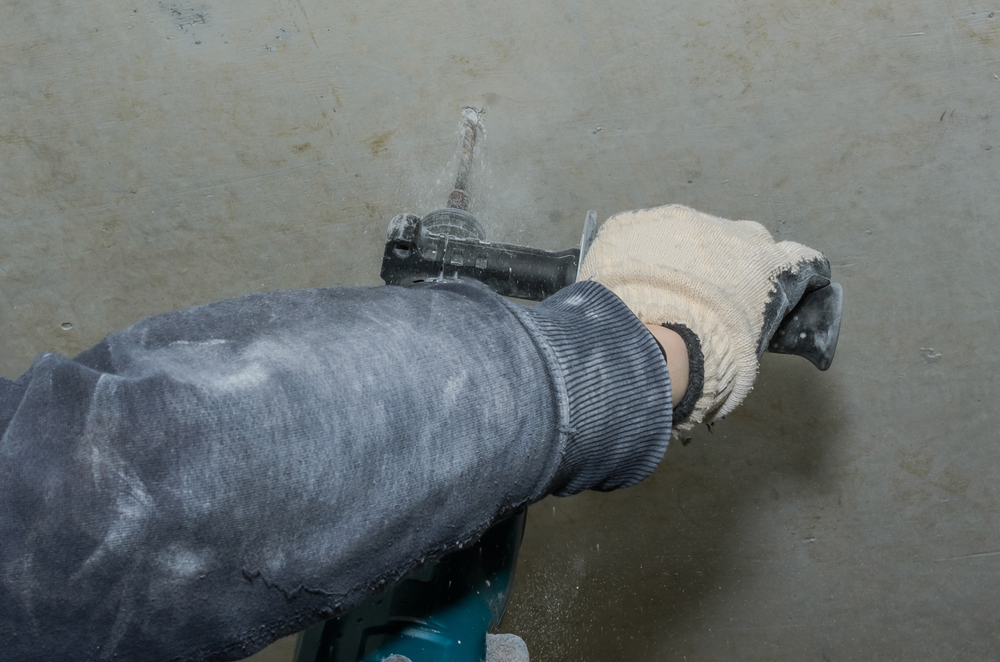
Tools You’ll Need
When it comes to drilling into a concrete lintel, having the right tools is essential for a successful and efficient task. Here are the key tools you’ll need:
- A hammer drill or SDS drill: These powerful drills are designed to deliver the necessary force to penetrate the tough surface of the lintel.
- An HSS drill bit: For steel lintels, using a high-speed steel (HSS) drill bit is recommended. This type of drill bit can handle the hardness of the steel and provide clean and precise holes.
- A masonry bit: When drilling into a concrete lintel, a masonry bit is a must-have. This specialized drill bit is designed to effectively drill through concrete and provide a smooth and accurate hole.
By using these tools, you’ll have the power and precision needed to drill into the lintel effectively.
Step-By-Step: Drilling Into Lintels
When it comes to drilling into lintels, following a step-by-step approach is crucial to ensure a successful outcome. By taking the right safety precautions and using the correct tools, you can complete this task with confidence.
To begin, it’s important to prioritise safety. Always wear safety goggles to protect your eyes from any debris or dust that may be generated during the drilling process. Additionally, make sure you have a stable ladder or platform to work from, especially if you are drilling above your head.
After ensuring your safety, the next step is to mark the exact spot where you want to drill the hole. Use a pencil or a marker to make a visible mark on the lintel. This will help you maintain accuracy and ensure that the hole is drilled in the desired location.
The next crucial step is choosing the right drill bit. For concrete lintels, a masonry bit is recommended, while for steel lintels, a high-speed steel (HSS) bit is more appropriate. Using the correct drill bit will ensure efficient drilling and prevent any damage to the lintel.
Once you have marked the spot and chosen the right drill bit, it’s time to start drilling. Begin with a low speed to prevent the drill bit from wandering, and gradually increase the speed as you progress. This will help maintain control and accuracy throughout the drilling process.
For steel lintels, it may be beneficial to use a pilot hole technique. Start with a smaller drill bit and create a pilot hole before using the desired size for the fixing hole. This technique can help ensure that the hole is drilled accurately and prevent the drill bit from slipping.
After drilling the hole, it’s essential to check the angle and depth. Use a measuring tape or ruler to determine if the hole is at the correct depth and angled properly. This is important as it will impact the stability of any fixtures or fittings that you attach to the lintel.

| Step | Description |
|---|---|
| Step 1 | Prioritise safety by wearing safety goggles and ensuring a stable working platform. |
| Step 2 | Mark the spot on the lintel where you want to drill the hole using a pencil or marker. |
| Step 3 | Choose the appropriate drill bit for the type of lintel (masonry bit for concrete, HSS bit for steel). |
| Step 4 | Start drilling with a low speed and gradually increase the speed, maintaining control and accuracy. |
| Step 5 | For steel lintels, consider using a pilot hole technique for accuracy and stability. |
| Step 6 | After drilling the hole, check the angle and depth to ensure proper stability for fittings or fixtures. |
Tips and Tricks
When drilling into lintels, there are some tips and tricks to make the process easier. Here are a few pointers to keep in mind:
- Drilling into steel lintels: When drilling into steel lintels, pay attention to heat buildup. If the steel becomes too hot, it can damage the drill bit or affect the integrity of the lintel. If you notice excessive heat, pause drilling and allow the steel to cool down before continuing.
- Drilling angles: It’s essential to drill at the correct angle to ensure the hole is straight and accurate. Position the drill perpendicular to the lintel surface to maintain the desired angle.
- Additional support: For heavier items like shelves or cabinets, consider drilling more holes for additional support. This will distribute the weight across multiple fixings, making it more secure and reducing the chances of the lintel cracking under the load.
By following these tips, you can make your drilling process smoother and achieve better results. Remember to always prioritize safety, choose the appropriate drill bits, and take your time to measure accurately.
| Tip | Description |
|---|---|
| Drilling into steel lintels | Pay attention to heat buildup and let the steel cool down if needed. |
| Drilling angles | Ensure you drill at the correct angle to create straight and accurate holes. |
| Additional support | Consider drilling more holes for heavier items to provide extra support and distribute the weight. |
Potential Challenges
Drilling into lintels can sometimes present unexpected challenges. One common challenge is encountering steel rods when drilling into concrete lintels. These steel rods are often used for reinforcement and can be located anywhere within the lintel. If you come across a steel rod while drilling, it may be necessary to adjust the position of your fixing hole to avoid it. This can be frustrating, but with the right tools and techniques, it’s manageable.
Another challenge is ensuring you have the right tools for the job. Using the wrong drill bits or drill settings can make the drilling process difficult and ineffective. For drilling into concrete lintels, make sure you have a good-quality masonry drill bit. If you’re drilling into steel lintels, specific drill bits such as high-speed steel (HSS) bits are required. Using the correct tools will make the drilling process much smoother and increase the chances of success.
It’s also important to be aware of potential challenges related to the lintel itself. Some lintels may have uneven surfaces or be made from harder materials, which can make drilling more difficult. Additionally, lintels that have been previously drilled may have existing holes that can affect the integrity and stability of the lintel. It’s important to assess the condition of the lintel before drilling and make any necessary adjustments to ensure a safe and effective drilling process.

Table: Common Challenges When Drilling Into Lintels
| Challenge | Description |
|---|---|
| Encountering Steel Rods | Steel rods used for reinforcement can be encountered while drilling into concrete lintels. It may be necessary to adjust the fixing hole position to avoid them. |
| Using the Wrong Tools | Using incorrect drill bits or settings can make drilling into lintels difficult. Ensure you have the right tools for the specific type of lintel you’re working with. |
| Difficult Lintel Surfaces | Some lintels may have uneven surfaces or be made from harder materials, making drilling more challenging. |
| Existing Holes | Lintels that have been previously drilled may have existing holes that can affect stability and the drilling process. Assess the condition of the lintel before drilling. |
Final Thoughts
As I conclude this guide on drilling into lintels, it’s important to emphasise the significance of prioritising safety and accuracy throughout the process. By following the right techniques and taking the necessary precautions, you can achieve a professional finish and ensure the structural integrity of your home.
Remember to always wear safety goggles and use the appropriate drill bits for the type of lintel you’re drilling into – masonry bits for concrete lintels and high-speed steel (HSS) bits for steel lintels. Taking the time to measure and mark the spot accurately will help you avoid any unnecessary mistakes.
Furthermore, maintaining a right angle while drilling and using sharp drill bits are good practices that contribute to the overall quality of the drilling process. Applying light pressure and giving the drill motor breaks to cool down are also important factors that can help you achieve the desired results.
By following these guidelines, you can confidently tackle the task of drilling into a lintel, ensuring safety, accuracy, and a professional finish for all your DIY projects.
Summary:
- Prioritise safety by wearing safety goggles throughout the drilling process.
- Choose the appropriate drill bits for the type of lintel – masonry bits for concrete lintels and HSS bits for steel lintels.
- Measure and mark the spot accurately before drilling to avoid mistakes.
- Maintain a right angle while drilling and use sharp drill bits for better results.
- Apply light pressure during drilling and give the drill motor breaks to cool down.
Overview: What is a Lintel?
A lintel is a crucial structural component of buildings, providing support and stability above windows and doors. It acts as a sturdy beam, transferring the weight of the structure to the surrounding walls, ensuring the integrity of the overall construction. Lintels play a vital role in distributing loads and preventing potential sagging or collapsing. They are typically made of materials such as concrete or steel, depending on the specific requirements of the building.
While the primary function of a lintel is to provide structural support, it can also contribute to the aesthetic appeal of a building. Lintels can be designed with artistic elements or decorative features that add character and charm to the architectural design. Whether in a traditional or modern setting, lintels have the potential to enhance the visual aesthetics while fulfilling their structural purpose.
The Importance of Lintels in Construction
Lintels are essential for ensuring the structural integrity of buildings, particularly in load-bearing walls. They distribute the weight of the wall and any additional loads from above, such as the roof, to the supporting walls or columns. By effectively distributing these loads, lintels help prevent the wall from sagging or collapsing under the weight, maintaining the overall stability of the structure. Lintels are critical components for maintaining a safe and secure building.
| Lintel Type | Advantages |
|---|---|
| Concrete Lintels | Strong and durable Cost-effective Can be customized for decorative purposes |
| Steel Lintels | High load-bearing capacity Lightweight Allows for larger window and door openings |
The choice between concrete and steel lintels depends on various factors, including the specific requirements and design considerations of the building. Concrete lintels are commonly used in traditional masonry structures and offer strength, durability, and versatility. Steel lintels, on the other hand, are often preferred in modern construction for their high load-bearing capacity and ability to support larger openings.
In summary, lintels serve as both essential structural components and potential decorative elements in buildings. Understanding their role and importance is crucial for anyone involved in construction or renovation projects.
How to Drill Into a Concrete Lintel
When it comes to drilling into a concrete lintel, there are a few key tips to keep in mind. First, it’s advisable to start with the smallest drill bit for masonry and gradually increase the size as needed. This approach ensures precision and reduces the risk of damaging the lintel. Additionally, concrete lintels often contain steel reinforcement, so there’s a possibility of encountering a steel rod while drilling. If this happens, it may be necessary to adjust the position of the fixing hole to avoid the reinforcement. By being prepared for these challenges, you can ensure a smooth drilling process.
Another important consideration when drilling into a concrete lintel is the choice of drill bits. Using Slotted Drive System (SDS) drill bits can provide better penetration and more efficient drilling. These specialized bits are designed to handle the tough composition of concrete and are recommended for drilling into concrete lintels. By using the right drill bits and following the appropriate techniques, you can achieve accurate and clean holes in your concrete lintel.
Table: Recommended Drill Bit Sizes for Concrete Lintels
| Hole Diameter | Masonry Drill Bit Size (mm) |
|---|---|
| 6mm | 5mm |
| 8mm | 7mm |
| 10mm | 9mm |
| 12mm | 10mm |
In summary, drilling into a concrete lintel requires careful planning and the right tools. Starting with the smallest drill bit for masonry and using Slotted Drive System (SDS) drill bits can ensure a successful drilling process. Additionally, being aware of the possibility of steel reinforcement and adjusting the drill hole position when necessary is crucial. By following these tips and using the appropriate techniques, you can confidently drill into a concrete lintel in your UK home setting.
How to Drill Through a Steel Lintel
Drilling through a steel lintel can pose some challenges due to the strength and durability of the material. However, with the right tools and techniques, it is still possible to achieve a successful outcome. Here are some tips to help you drill through a steel lintel:
- Choose the right drill bit: When drilling through a steel lintel, it is important to use a high-speed steel (HSS) drill bit. HSS bits are specifically designed to withstand the hardness of steel and provide efficient drilling.
- Use lubrication: Drilling through steel can generate a significant amount of heat, which can lead to the drill bit getting dull or even breaking. Use a lubricating oil or cutting fluid to keep the drill bit cool and lubricated, reducing friction and allowing for smoother drilling.
- Start with a small pilot hole: To ensure accuracy and prevent the drill bit from slipping, start by drilling a small pilot hole before enlarging it to the desired size. This will help guide the drill bit and create a clean and precise hole.
- Apply consistent pressure: When drilling through a steel lintel, apply steady and consistent pressure to maintain control over the drilling process. Avoid using excessive force, as it can lead to damage or breakage of the drill bit.
By following these tips and taking the necessary precautions, you can successfully drill through a steel lintel and complete your DIY project with ease. Remember to prioritize safety at all times and use protective gear such as safety goggles and gloves to protect yourself during the drilling process.
| Tools | Materials |
|---|---|
| – High-speed steel (HSS) drill bit | – Steel lintel |
| – Lubricating oil or cutting fluid | – Safety goggles |
| – Drill | – Gloves |
| – Pilot drill bit |
Precautions for Drilling Through a Steel Lintel
While drilling through a steel lintel, it is crucial to take certain precautions to ensure safety and efficiency:
- Wear protective gear: Always wear safety goggles and gloves to protect your eyes and hands from debris and potential hazards.
- Secure the lintel: Make sure the steel lintel is securely fixed to avoid any movement or vibrations during drilling.
- Work in a well-ventilated area: Drilling through steel can create metal fragments and dust. It is important to work in a well-ventilated area or use proper ventilation equipment to prevent inhalation of harmful particles.
- Check for electrical wires or plumbing: Before drilling, ensure there are no electrical wires or plumbing pipes running through the area to avoid accidents.
By following these precautions and using the recommended tools, you can confidently drill through a steel lintel and complete your project successfully.
Good Practices for Drilling
When it comes to drilling, there are a few key techniques to keep in mind for successful results. Maintaining a right angle throughout the drilling process is essential for creating straight and accurate fixing holes. This ensures that your curtain rails or other items will be securely mounted.
Another important factor is the sharpness of your drill bits. Before you start drilling, always check that your drill bit is sharp and in good condition. Dull drill bits can cause uneven holes and make the drilling process more difficult. If your drill bit is dull, replace it with a new one to ensure clean and precise holes.
Additionally, it’s important to apply light and gentle pressure when drilling. Using excessive force can cause the drill to slip or create unnecessary vibrations. By applying steady and controlled pressure, you can maintain control over the drilling process and achieve better results.
Lastly, don’t forget to take breaks during the drilling process. This not only allows the drill motor to cool down and prevent overheating, but it also gives you an opportunity to check the depth of the hole. Checking the depth ensures that you drill to the desired depth and avoid any mistakes.
FAQ
Is drilling into a concrete lintel a common DIY task in the UK home setting?
Yes, drilling into a concrete lintel is a common DIY task in the UK home setting, especially when hanging curtain rails or fixing a curtain track.
What are lintels and what are they used for?
Lintels are solid beams located above windows and doors in buildings. They provide structural support, conveying the weight to the surrounding walls, and can also serve as a decorative element in architecture.
What tools do I need to drill into a concrete lintel?
Essential tools for drilling into a concrete lintel include a hammer drill or SDS drill, an HSS drill bit for steel lintels, and a masonry bit for concrete lintels.
What are the steps to drill into a lintel?
The steps to drill into a lintel involve prioritizing safety, measuring and marking the spot, choosing the appropriate drill bit, starting with a low speed and gradually increasing it, using a pilot hole technique for steel lintels, and checking the angle and depth of the drilled hole before fixing anything.
Are there any tips and tricks for drilling into lintels?
Yes, some tips and tricks include paying attention to heat buildup when drilling steel lintels, avoiding drilling too close to the edge of the lintel, and considering drilling more holes for additional support when hanging heavier items.
What are some potential challenges when drilling into lintels?
One potential challenge is encountering steel rods while drilling into a concrete lintel, which may require adjusting the fixing hole position. Another challenge is using the right tools for the job to ensure successful drilling.
What is a lintel?
A lintel is a solid beam located above windows and doors in buildings. Its main purpose is to provide structural support, conveying the weight to the surrounding walls, but it can also serve as a decorative element in architecture.
How do I drill into a concrete lintel?
To drill into a concrete lintel, start with the smallest drill bit for masonry and gradually increase the size as needed. Pay attention to the possibility of encountering steel reinforcement and adjust the fixing hole position if necessary. Using Slotted Drive System (SDS) drill bits can provide better penetration for both steel and concrete reinforcement.
How do I drill through a steel lintel?
When drilling through a steel lintel, switch to a high-speed steel (HSS) bit after penetrating the plaster. Inserting self-tapping screws through the plaster and into the steel lintel may require more effort due to the thickness of the material. Having a full range of drill bits, including SDS ones, is essential for drilling through steel lintels.
What practices should I follow when drilling into lintels?
Good practices for drilling into lintels include maintaining a right angle when drilling to create straight and accurate fixing holes, checking that your drill bit is sharp before starting, applying light and gentle pressure during drilling, and taking breaks to allow the drill motor to cool down and check the hole’s depth.
- Drill Battery Maintenance: Essential Tips for Cordless Drill Battery Care - February 5, 2024
- Troubleshooting Drill Issues - February 5, 2024
- Quick Drilling Techniques - February 2, 2024