If you work with a lot of tools, keeping them organised can be a challenge. Whether you are a mechanic, carpenter, business owner, or homeowner, having a well-organised tool cart is essential.
By customising your tool foam, utilising toolbox organisers, and implementing toolbox shadowing foam, you can create an efficient and organised workspace. With these tips and hacks, you’ll be able to maximise the potential of your rolling tool cart and keep everything in its place.
Key Takeaways
- Customising your tool foam helps keep your tools organised and easy to find.
- Utilise toolbox organisers to create designated spaces for different tools.
- Implement toolbox shadowing foam to easily identify missing tools.
- Planning and cutting the foam with precision ensures a neat and professional-looking result.
- Consider customising tool spaces for easy tool pick-up and efficient workflow.
Selecting the Right Tool Foam
When it comes to organising your tools, having the right tool foam is essential. There are various options available, such as foam tool kits and foam drawer liners, that can help you create a well-organised tool cart. Here are some key factors to consider when selecting the right tool foam:
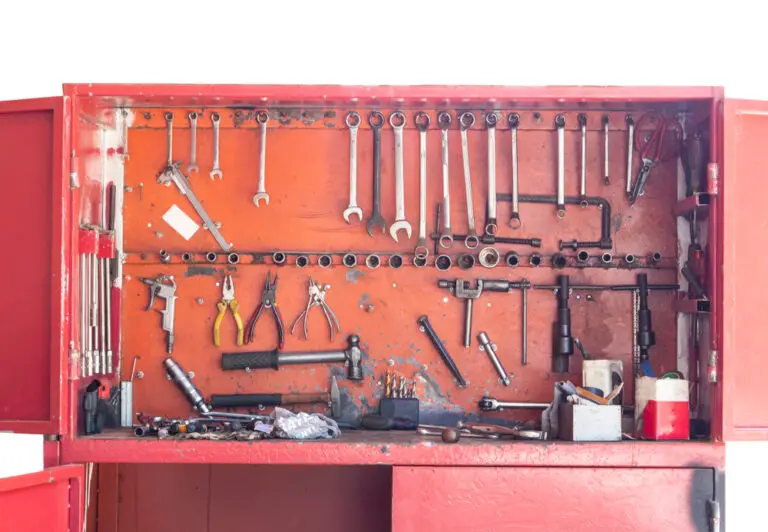
- Style, size, and colour: Tool foam comes in different styles, sizes, and colours. You can choose between single-colour foam drawer liners or two-colour foam organiser kits. The two-colour foam kits serve as shadow boards, making it easy to identify missing tools.
- Material: Make sure the foam you choose is water-resistant and durable. This will ensure that it can withstand the wear and tear of daily use.
Table: Tool Foam Options
| Tool Foam | Style | Size | Multiple colour options | Material |
|---|---|---|---|---|
| Foam Tool Kits | Single-colour | Various sizes | Multiple color options | Water-resistant and durable |
| Foam Drawer Liners | Colour | Various colour options | Various color options | Water-resistant and durable |
Planning and Cutting the Foam
When it comes to organising your tools, cutting the foam to size is a crucial step. Proper planning and precise cutting ensure that your tools fit snugly in their designated spaces, maximising the efficiency of your tool cart. Whether you’re using a utility knife or a foam hot knife, following the right techniques can make all the difference in achieving clean and accurate cuts.
Choosing the Right Cutting Tool
There are two primary options for cutting foam: a utility knife or a foam hot knife. A utility knife is a versatile tool that can be used for smaller cutting projects. Opt for a sharp blade and take your time to ensure clean and accurate cuts. On the other hand, a foam hot knife is ideal for larger cutting projects or thicker foam. It provides precise and effortless cuts, allowing you to create intricate shapes and designs.
Creating a Cutting Plan
Before cutting the foam, it’s important to have a well-thought-out plan. Lay out your tools on top of the foam, arranging them in the desired order. Take note of any specific measurements or spacing requirements. Once you have your layout, trace the outline of each tool onto the foam using a pen or a marker.
Executing the Cuts
With your cutting plan in place, it’s time to start cutting the foam. For smaller cutting projects, use a utility knife with a sharp blade. Make slow and steady cuts, following the traced lines. If you’re working with thicker foam or need more precision, a foam hot knife is the way to go. It effortlessly glides through the foam, allowing for more intricate cuts.
Summary:
- Choose the right cutting tool: utility knife for smaller projects, foam hot knife for larger or thicker foam.
- Create a cutting plan by laying out your tools on the foam and tracing their outlines.
- Use a sharp blade and make slow, steady cuts when using a utility knife.
- Consider a foam hot knife for more precise cuts and intricate shapes.
- Take breaks as needed to ensure accurate and clean cuts.
Customising Tool Spaces
When it comes to organising your rolling tool cart, customisation is key. By customising the tool spaces in your foam, you can ensure easy tool pick-up and maximise efficiency. Here are some effective ways to customise your tool spaces:
1. Hole Punch
If you want to make it easier to grab tools quickly, consider using a hole punch on the foam. By creating small holes on either side of a tool’s handle, you can easily slide your fingers in and lift the tool out of its place. This technique works well for tools with long handles or those that are frequently used.
2. Semi-Circle Cut
Another way to customise your tool spaces is by cutting semi-circles on each side of a tool’s handle. This allows you to grip the handle firmly and lift the tool out of the foam with ease. It’s especially useful for tools with thicker handles or those that require a secure grip for safety reasons.
3. Strip Cutting
If you have a category of tools that you frequently use together, you can create a horizontal strip through all the tools in that category. By cutting a strip on the foam, you can easily slide your fingers underneath the tools and lift them out together. This method is perfect for sets of wrenches or screwdrivers that are often used in sequence.
Maximising Space for Small Tools
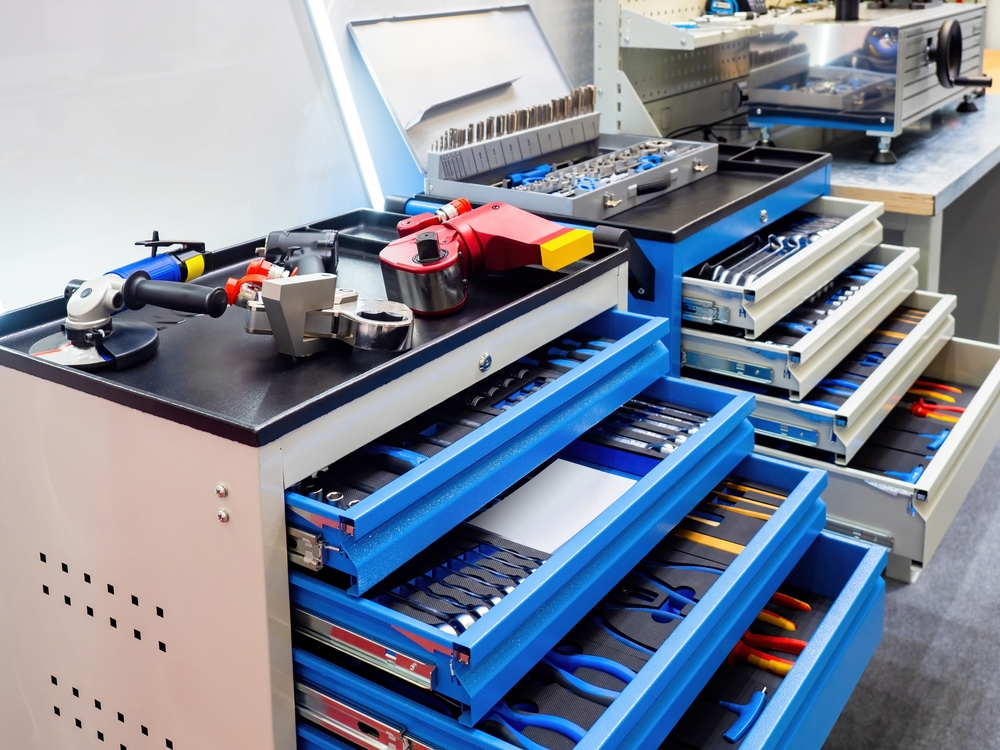
When it comes to organising small tools, such as wrenches and sockets, a well-designed tool foam can make a significant difference. By utilising small tool organisers, you can ensure that each tool has its designated space, making it easy to locate and retrieve them quickly.
One effective technique is arranging the small tools close together in a line or fitting them together like puzzle pieces. This not only maximises the available space but also keeps the tools organised and prevents them from rattling around. To optimise space even further, consider alternating the direction of the tools within the foam, allowing for a tighter fit.
Another option is to use wrench organisers or socket organisers that come with built-in compartments for each size. These organisers eliminate the need for guesswork and ensure that every tool has its designated spot. Additionally, they often have clear markings or labels, making it easy to identify missing tools or where each tool should be placed.
| Advantages of Small Tool Organisers | Disadvantages of Small Tool Organisers |
|---|---|
|
|
Accommodating Power Tools and Accessories
When it comes to organising a rolling tool cart, it’s essential to consider the storage needs of power tools and their accompanying accessories. This ensures that everything is easily accessible and well-protected. By incorporating toolbox foam inserts, cord and battery storage, thick foam, and a retractable blade for cutting, you can create a tailored solution for your power tools.
One of the key aspects of accommodating power tools is using toolbox foam inserts. These inserts provide a secure and snug fit for your tools, preventing them from shifting or getting damaged during transport. They also help to organise and separate different tools, making it easier to locate specific items when needed.
When planning the foam layout for power tools, don’t forget to allocate space for cords and batteries. Cord and battery storage compartments can be incorporated into the foam design. This ensures that all essential components are stored in a designated area, preventing the risk of tangled cords or misplaced batteries.
To achieve a perfect fit for larger power tools, consider using thick foam or layered foam sheets. This provides extra protection and support for the tools, keeping them securely in place. When cutting the thick foam, a retractable blade is ideal as it allows for precise and controlled cuts without damaging the surrounding foam.
Table: Foam Layout for Power Tools
| Power Tool | Foam Slot Size | Additional Space for Cords and Batteries |
|---|---|---|
| Drill | 2.5″ x 8″ | 1″ x 8″ |
| Saw | 3″ x 12″ | 1.5″ x 12″ |
| Grinder | 4″ x 10″ | 2″ x 10″ |
By following these tips and utilising tool box foam inserts, cord and battery storage compartments, thick foam, and a retractable blade for cutting, you can effectively accommodate power tools and their accessories in your rolling tool cart.
Economical Foam Cutting Tips
When it comes to organising your rolling tool cart with foam, there are a few economical tips and tricks to consider. One of the most cost-effective options is to purchase a large foam sheet or foam kit that can be cut to fit multiple drawers. By doing this, you can save money and ensure a consistent look throughout your cart.
Before you start cutting the foam, it’s essential to measure the exact sizes of your drawers. Use a tape measure and a straight edge to neatly cut the foam according to the measurements. This will ensure that the foam fits perfectly in your drawers, maximising the available space and keeping everything organised.
Additionally, consider using a utility knife or foam cutting tools for precision and clean cuts. These tools are affordable and readily available, making them ideal for DIY foam projects.
Table: Foam Cutting Tips
| Tip | Description |
|---|---|
| Buy Large Foam Sheets or Kits | Purchasing a large foam sheet or kit can be more economical than buying individual foam inserts for each drawer. |
| Measure and Cut with Precision | Use a tape measure and straight edge to accurately measure and cut the foam according to the dimensions of your drawers. |
| Use the Right Cutting Tools | A utility knife or foam cutting tools can help you achieve clean and precise cuts in the foam. |
Conclusion
Organising your rolling tool cart is crucial for an efficient and productive workspace. By customising your tool foam, planning and cutting with precision, and maximising space for tools and accessories, you can create a well-organised tool cart. Utilise the tips and hacks mentioned in this article to boost your workspace efficiency and keep your tools in order. With proper organisation, you can save time and work more effectively.
Remember, a well-organised tool cart not only saves you time searching for tools, but it also ensures that everything has its place. By customising your foam to fit your tools, you will have an organised and clutter-free workspace that promotes productivity. So, go ahead and apply these tool cart organisation tips to maximise the potential of your rolling tool cart.
No more wasting time searching for misplaced tools or dealing with messy work areas. Take control of your workspace and enjoy the benefits of a well-organised tool cart. Start implementing these organisation tips today and experience the difference it makes to your productivity and efficiency.
FAQ
How do I select the right tool foam?
When selecting tool foam, consider the style, size, and color that best suits your needs. Choose between single-color foam drawer liners or two-color foam organiser kits. Two-color foam kits function as a shadow board, making it easy to identify missing tools. Also, ensure the foam is water-resistant and durable.
What tools do I need for cutting the foam?
For smaller cutting projects, a utility knife or an X-Acto knife will suffice. However, for larger cutting projects or thicker foam, it’s best to use a foam hot knife for clean and precise cuts.
How can I customise the tool spaces in the foam?
To ensure easy tool pick up, you can cut semi-circles on each side of a tool’s handle or create a horizontal strip through all the tools in a specific category. These customisations make it easy to grab tools quickly and efficiently from your tool cart.
How can I maximise space for small tools?
Arrange small tools close together, either in a line or by fitting them together like puzzle pieces. Consider alternating the direction of the tools to maximise space. However, if spacing out tools among multiple drawers makes more sense for your workflow, go with a layout that suits your needs.
How do I accommodate power tools and accessories?
When planning foam layouts for power tools, don’t forget to make space for cords and batteries. Cut out spaces for these accessories to prevent them from getting lost or damaged. For larger tools, like drills, use thicker foam or layered foam sheets to ensure a snug fit. When cutting thick foam, use a retractable blade to achieve the exact depth needed without cutting through the foam.
How can I cut foam economically?
If you plan to use foam in multiple drawers, it’s more economical to buy a large foam sheet or foam kit and cut it to fit several drawers. Measure the exact sizes of your drawers and use a tape measure and straight edge to neatly cut the foam. Before proceeding, double-check that the cut foam sheets fit perfectly in the drawers.
- Drill Battery Maintenance: Essential Tips for Cordless Drill Battery Care - February 5, 2024
- Troubleshooting Drill Issues - February 5, 2024
- Quick Drilling Techniques - February 2, 2024