Installing laminate flooring is a popular DIY project that can save you money. To successfully install laminate flooring, you will need a specific set of tools.
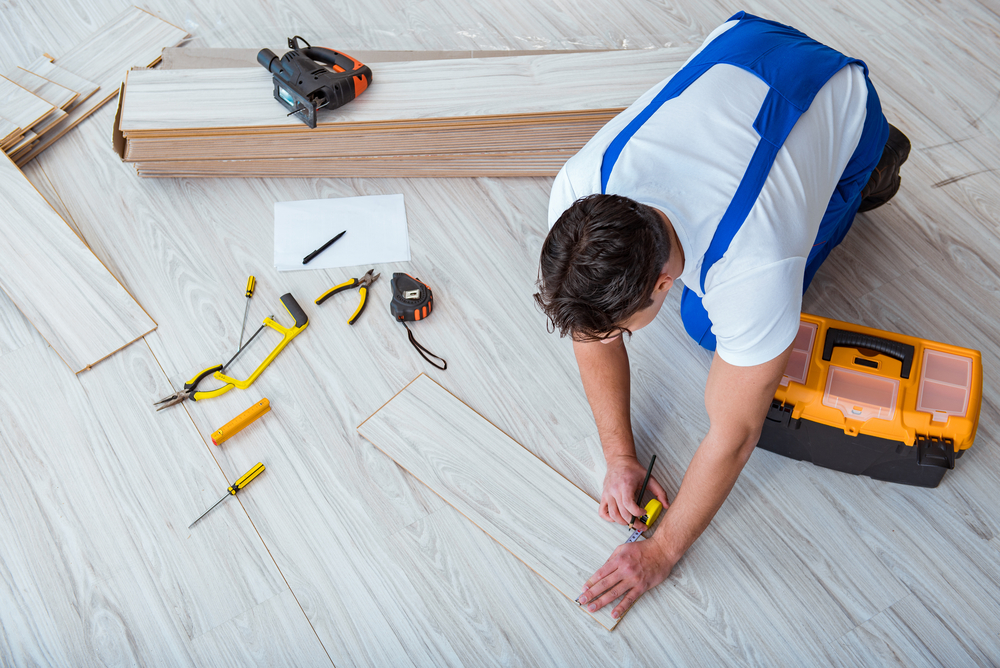
These tools include a jigsaw for cutting laminate pieces, a rubber mallet and tapping block for joining pieces together, a pull bar for tight spots, a tape measure for accurate measurements, a combination square for marking cutting lines, a sliding T-bevel for measuring angles, a hand-held drill and spade bit for cutting holes for pipes, and other basic tools like a utility knife, hammer, pencil, and tape measure. Additionally, you will also need materials such as laminate flooring, underlayment, barrier sheeting, laminate glue, adhesive, quarter-round moulding, and plastic sheeting to cover furniture or close off adjacent rooms.
Key Takeaways:
- Laminate flooring installation requires specific tools and materials.
- Essential tools include a jigsaw, rubber mallet, tapping block, pull bar, and tape measure.
- Materials needed include laminate flooring, underlayment, barrier sheeting, laminate glue, and quarter-round moulding.
- Additional considerations include safety equipment, various saws, and cleaning supplies.
- Having the right tools and materials is crucial for a successful laminate flooring installation project.
Laminate Flooring Tools
When it comes to installing laminate flooring, having the right tools is essential for a smooth and successful project. Let’s take a look at some of the key tools you’ll need:
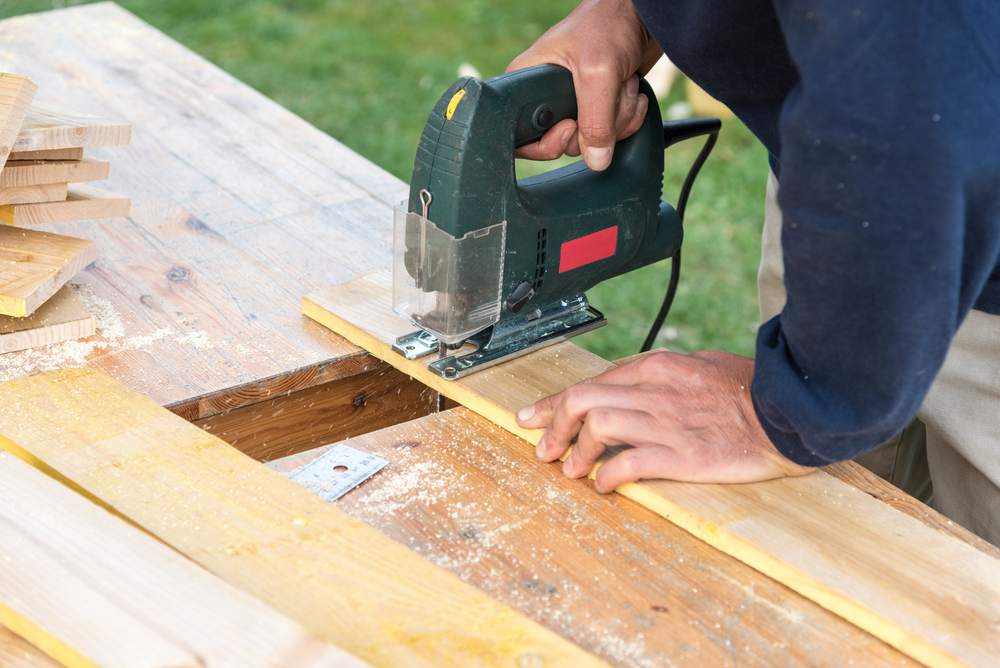
Jigsaw
The jigsaw is a must-have tool for cutting laminate pieces to length. Its safety features and lack of airborne dust make it a preferred choice over a chop saw. With a jigsaw, you can make precise and accurate cuts, ensuring a perfect fit for your laminate flooring.
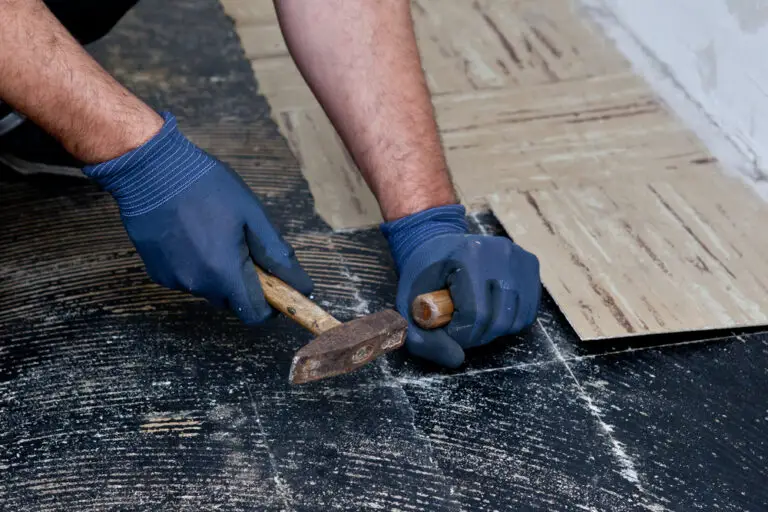
Rubber Mallet and Tapping Block
Joining laminate pieces together end-to-end requires a rubber mallet and tapping block. These tools allow you to connect the pieces tightly without damaging the edges. The rubber mallet provides the necessary force to ensure a secure fit, while the tapping block helps distribute the pressure evenly.
Pull Bar
In tight spaces where a mallet and tapping block cannot be used effectively, a pull bar comes in handy. This tool allows you to pull laminate pieces together tightly, ensuring a seamless transition between boards. It’s especially useful when working near walls or other obstacles.
Tape Measure

Accurate measurements are crucial in laminate flooring installation. A tape measure enables you to measure and mark pieces that need to be cut to fit around corners and obstacles. Make sure to measure twice to avoid any costly mistakes.
| Tool | Description |
|---|---|
| Jigsaw | Used for cutting laminate pieces to length |
| Rubber Mallet and Tapping Block | Used for joining pieces together end-to-end |
| Pull Bar | Used for pulling pieces together tightly in tight spaces |
| Tape Measure | Used for accurate measurements and marking cutting lines |
These are just a few of the essential tools you’ll need for laminate flooring installation. Depending on the specifics of your project, additional tools such as a combination square, sliding T-bevel, hand-held drill, and spade bit may also be required. By having the right tools at your disposal, you can ensure a professional and successful installation of your laminate flooring.
Essential Materials for Laminate Flooring
When it comes to installing laminate flooring, having the right materials is just as important as having the necessary tools. Here are the essential materials you’ll need for a successful laminate flooring installation:
- Underlayment: This is a crucial layer that provides cushioning, sound insulation, and helps correct any imperfections in the subfloor.
- Barrier Sheeting: Used to prevent moisture and sound transmission, barrier sheeting is essential for protecting the laminate flooring from potential damage.
- Laminate Glue and Adhesive: These are used to secure the laminate pieces in place, ensuring a durable and long-lasting installation.
- Quarter-Round Molding: This molding is used to create a finished look at the edges of the laminate flooring, giving it a polished appearance.
- Plastic Sheeting: It’s important to protect your furniture and close off adjacent rooms during the installation process. Plastic sheeting helps keep your belongings safe and prevents dust and debris from spreading.
By ensuring you have these essential materials, you’ll be well-prepared to tackle your laminate flooring installation project with confidence and achieve professional results.
Additional Considerations for Laminate Flooring Installation
When it comes to laminate flooring installation, there are a few additional factors to keep in mind that can make the process smoother and more successful. Here are some important considerations:
Safety Precautions
- Wear safety goggles and gloves to protect your eyes and hands during the installation process.
Spacers
Using spacers is essential to leave a small gap around the edge of the room. This gap allows for natural expansion and contraction of the laminate flooring, preventing buckling and warping over time.
Tools for Specific Cuts
Depending on the specific needs of your installation project, you may require additional tools such as a router, saws (table saws, miter saws, circular saws, jigsaws), dividers, and a chalk line. These tools can help you achieve precise cuts and create professional-looking results.
Maintenance and Cleaning
Keeping your laminate flooring in top condition requires regular maintenance and cleaning. Laminate floor cleaner, along with white vinegar for a natural cleaning solution, can help you remove dirt, stains, and grime. Additionally, using a pocket plane can be useful for small adjustments and repairs.
By considering these factors and taking the necessary precautions, you can ensure a successful and long-lasting laminate flooring installation. Remember to gather the right tools, use spacers, follow safety guidelines, and maintain your laminate flooring properly for years of enjoyment.
| Consideration | Description |
|---|---|
| Safety Precautions | Wear safety goggles and gloves to protect your eyes and hands during the installation process. |
| Spacers | Use spacers to leave a small gap around the edge of the room to allow for expansion and contraction of the laminate flooring. |
| Tools for Specific Cuts | Depending on your project’s needs, consider using a router, saws (table saws, miter saws, circular saws, jigsaws), dividers, and a chalk line for precise cuts. |
| Maintenance and Cleaning | Regularly maintain and clean your laminate flooring using laminate floor cleaner and white vinegar. Use a pocket plane for small adjustments and repairs. |
Conclusion
In conclusion, I’ve highlighted the essential tools and materials you’ll need for a successful laminate flooring installation. By using the right tools such as a jigsaw, rubber mallet, tapping block, and pull bar, you can ensure precise cuts and proper joining of laminate pieces. These tools, along with a tape measure and other basic tools, will make your installation process much smoother.
Additionally, don’t forget the importance of having the necessary materials. Underlayment, barrier sheeting, laminate glue, and quarter-round molding are all crucial for achieving a professional and finished look. These materials will not only enhance the overall appearance of your laminate flooring, but also ensure its durability and longevity.
As you embark on your laminate flooring installation project, remember to follow safety precautions, measure accurately, and employ appropriate techniques. Always wear safety goggles and gloves to protect yourself during the installation process. By using the right tools, materials, and techniques, you can achieve a beautiful laminate flooring installation that will transform your space.
For more tips and guidance on laminate flooring installation, be sure to refer to the detailed notes provided in this article. With the right tools and materials in hand, you’ll be well-equipped to tackle this popular DIY project and create a stunning new look for your home.
FAQ
What tools do I need to install laminate flooring?
To install laminate flooring, you will need a jigsaw, rubber mallet, tapping block, pull bar, tape measure, combination square, sliding T-bevel, hand-held drill, spade bit, and other basic tools like a utility knife, hammer, pencil, and tape measure.
What materials are required for laminate flooring installation?
The materials needed for laminate flooring installation include underlayment, barrier sheeting, laminate glue, adhesive, quarter-round molding, and plastic sheeting to cover furniture or close off adjacent rooms.
Why is a jigsaw essential for laminate flooring installation?
A jigsaw is used for cutting laminate pieces to length and is preferred over a chop saw due to its safety features and lack of airborne dust.
How are laminate pieces joined together?
To join laminate pieces together, a rubber mallet and tapping block are used to ensure a tight fit without damaging the edges.
What is the purpose of a pull bar in laminate flooring installation?
A pull bar is necessary for pulling pieces together tightly in tight spaces where a mallet and tapping block cannot be used effectively.
What are spacers used for in laminate flooring installation?
Spacers should be used to leave a small gap around the edge of the room to allow for expansion and contraction of the laminate.
What safety precautions should I take during laminate flooring installation?
Safety goggles and gloves are recommended to protect your eyes and hands during the installation process.
Are additional tools required for laminate flooring installation?
Depending on the specific needs of your project, other tools like a combination square, sliding T-bevel, hand-held drill, spade bit, router, table saws, miter saws, circular saws, jigsaws, dividers, chalk line, and a pocket plane may be required.
How do I maintain and clean laminate flooring?
Laminate floor cleaner and white vinegar should be used for the maintenance and cleaning of your laminate flooring.
- Drill Battery Maintenance: Essential Tips for Cordless Drill Battery Care - February 5, 2024
- Troubleshooting Drill Issues - February 5, 2024
- Quick Drilling Techniques - February 2, 2024